Are you looking to add a touch of greenery to your home but tired of the usual boring planters? Upcycling is the perfect way to get creative and add a unique touch to your indoor or outdoor garden. With some simple DIY skills and a bit of imagination, you can turn everyday objects into stunning planters that will bring new life to your space. Seeing that, we’ve compiled a list of creative DIY planter ideas that will inspire you to upcycle your home and create a sustainable indoor garden that’s both beautiful and eco-friendly. So, grab your tools, and let’s get started on this exciting journey of turning trash into treasure.
Make Fun DIY Cinder Block Garden Planters Under $5!
Looking to spruce up your garden without breaking the bank? Why not try making some DIY cinder block planters? Not only are they super affordable (under $5 per planter!), but they’re also straightforward to make. All you need are some cinder blocks, potting soil, and your choice of plants. You can stack the blocks in different configurations to create unique designs and even paint them to match your outdoor decor.
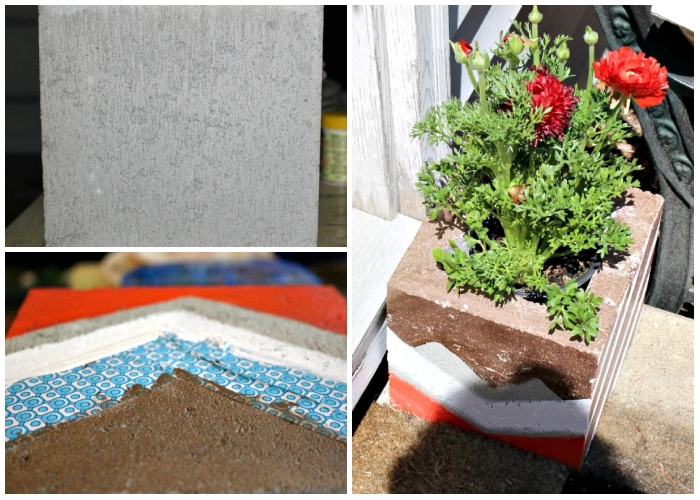
The best part: cinder blocks are readily available at most hardware stores, so you can start your project immediately. And the transformation from an unattractive block to a stylish planter is impressive. You can create a beautiful garden that won’t break the bank with creativity and DIY spirit. So go ahead, try it, and see the difference for yourself!
DIY Bubble Wrap Pots
Do you know that feeling of satisfaction when you pop a bubble wrap? Imagine that feeling multiplied when you use unpopped bubble wrap to make these cute little cement pots for your plants. You can use either regular cement or soap for this project.
It’s so simple: all you need to do is cut the bubble wrap in the size you want, wrap it around a plastic pot, and use the cement mixture to coat it. Wait for it to dry, and then gently peel off the bubble wrap. Voila! You’ve got a textured and unique pot for your plants. Get popping and start creating!
Find the Right Use for Old Toys
Everybody has a little child inside of them that wants to play. But the world we create is too rigid for our children. That’s okay! This might be your favorite idea if you still have your childhood toys.
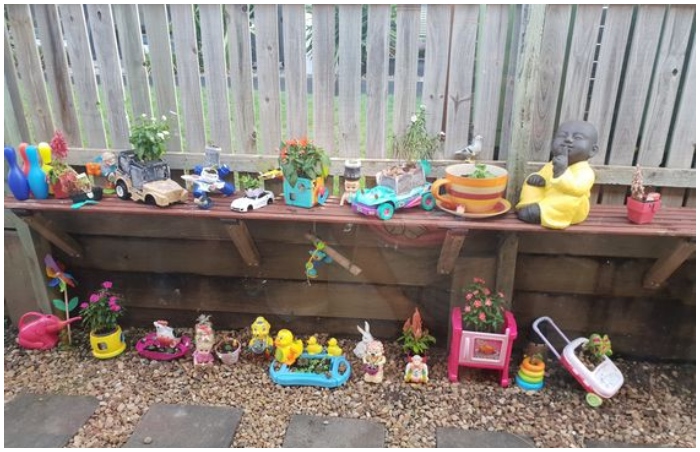
Essential to check: ensure you have enough space for your planter in your toy. You can paint it any color you want, but it will take several coats to dry completely. Then, plant your adorable sapling inside. This would make a great conversation starter.
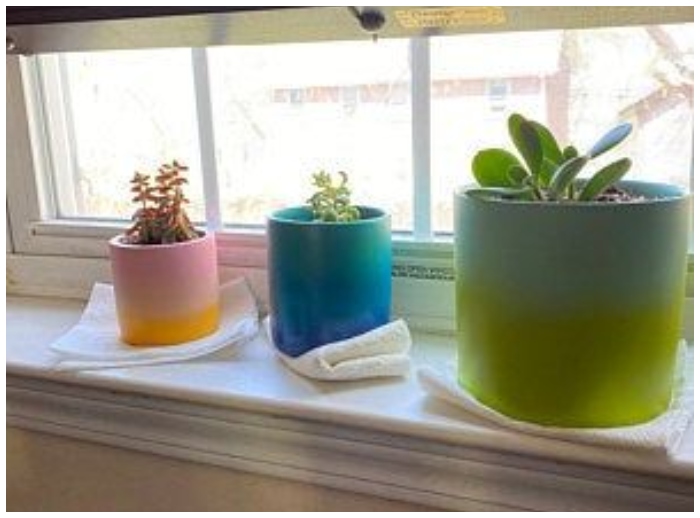
DIY Doodle Pots
Get ready to add some personality to your plants with this fun and easy DIY project – introducing DIY Doodle Pots! With just a few basic materials, you can create unique and colorful pots that will brighten up any space. All you need: some paint, a thick paintbrush, and some pots to plant your beauty. The best part? You can let your imagination run wild and paint whatever you want!

But if you’re looking for inspiration, we recommend trying out some simple and cute semi-circles and half-circles. Don’t worry about being perfect – the imperfections make these pots unique and charming. The possibilities are endless regarding colors and designs, so get creative! Whether you’re a seasoned artist or a beginner, this is a DIY project that anyone can do. So grab your paintbrush, and let’s start creating adorable and personalized pots for your plants!
Disco Ball Plant Hanger
Bring the party to your indoor garden with this stunning Disco Ball Plant Hanger! It doesn’t matter if you’re living in a dorm or your own place; you deserve to have this shiny and gorgeous planter hanging from your ceiling.
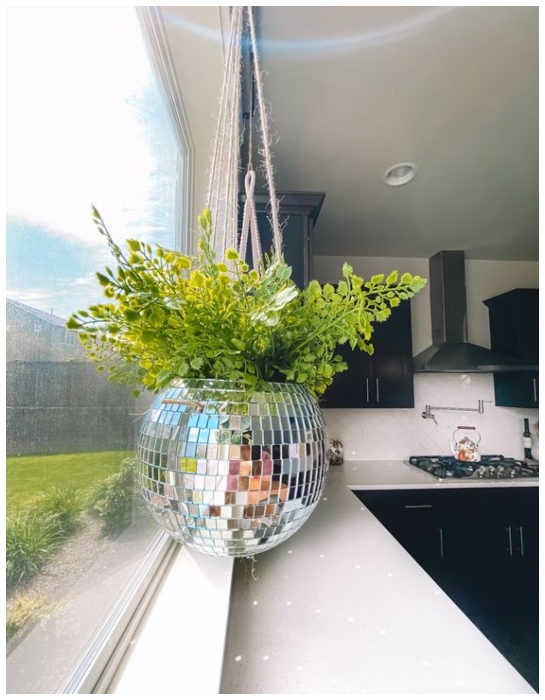
What it gives you: as the light reflects from the half disco ball planter, it will add a pop of vibrancy and life to any space you put it in, all while giving you and your guests some serious dance floor feels. It can also hold a plant, making it the perfect party accessory that’s both stylish and functional.
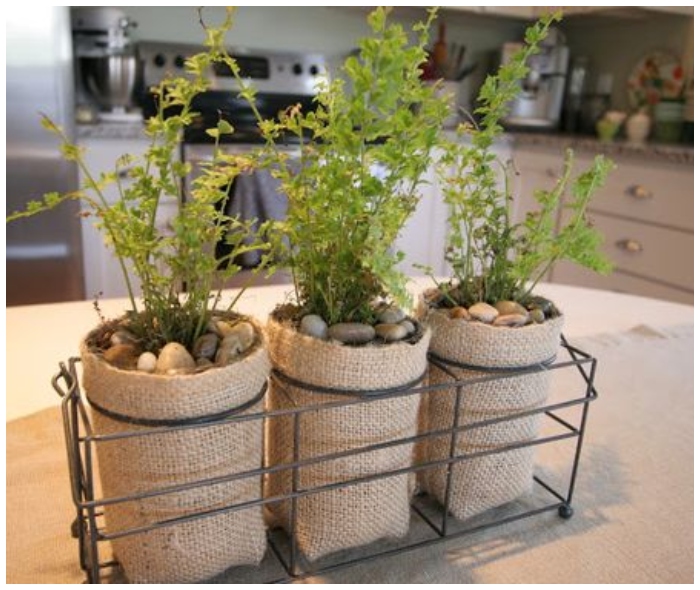
Glass Planters from Jars
It’s far more accessible than it seems, we promise! You will need a few screws and metal fittings. Let’s take some time to measure and get started! Don’t forget your mason jars.
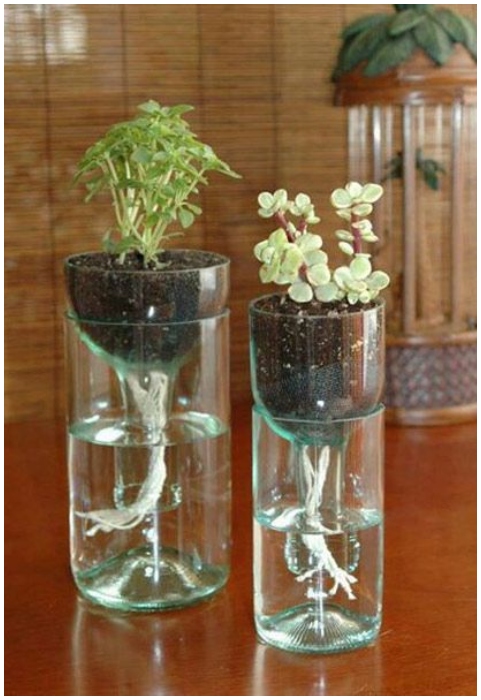
Don’t forget: Wrap each mason container with a metal fitting so that it can be hung from the wooden board. Afterward, you can fill the jars with water and place your sapling and flower cuttings inside.
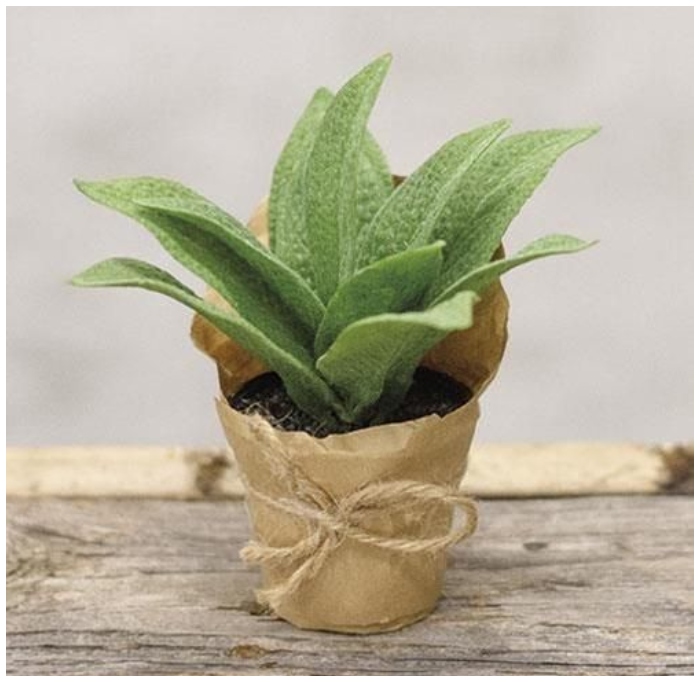
DIY Gift wrapping Planter
Get ready to give the ultimate gift with this unique DIY project! Introducing the gift wrapping planter – a perfect way to add some greenery to your gift while also showing off your creative side. Don’t worry if you’re not a DIY pro; plenty of local artists sell these one-of-a-kind planters. But if you’re up for a challenge, get ready to flex those creative muscles and make your own!
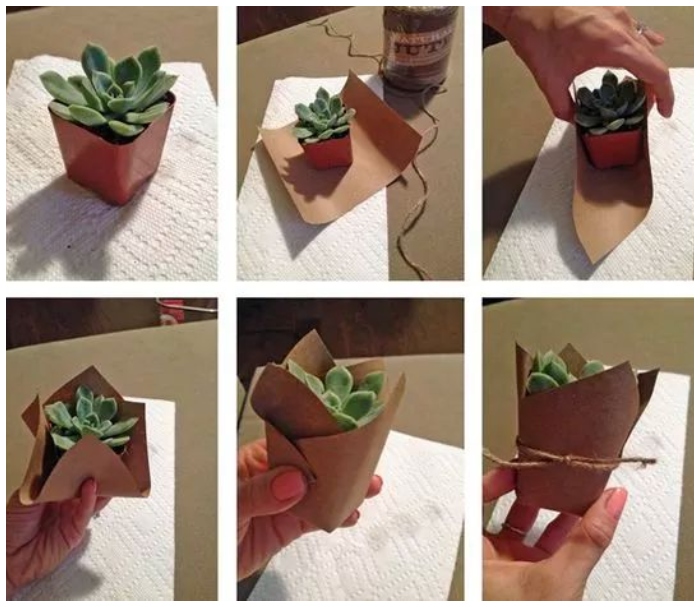
With a bit of planning and some patience, you can transform a plain old paper bag into a rustic planter in no time. The secret: Cement! Mix it up, mold it into shape, and voila – a planter that looks like a crumpled paper bag. It may take a couple of days for the cement to dry, but trust us; the result is worth the wait. So what are you waiting for? Let’s get planting!
Tires as a Chandelier of Plants
This is an excellent opportunity to repurpose and recycle bike tires you don’t use. These tire planters are unique! They would look great in our home.
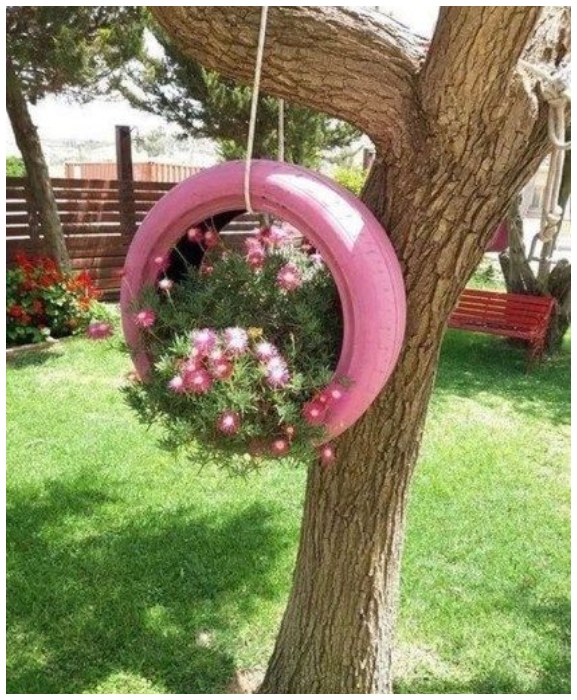
How to do it: after you have cleaned your tires, you can decide how to attach them to the ceiling. You want the material to be strong but also cute and cool. The simple rope is all you need, but you can also use metal chains and tie the rope through their links.
Impress Your Friends With Stone Planter
Here’s a hack for all the crafty people out there! With some plaster of Paris or cement, scraps of cardboard, tape, and glue, you can create a beautiful plant pot that will impress your friends. Simply shape the cardboard, pour the cement, and add a cup or glass for the plant. Wait for it to set, and voila! You’ll have a stylish new plant pot in no time.
The best part: This DIY cement plant pot can quickly bring greenery into your home without breaking the bank. It is a fun project to work on and an environmentally friendly way to reuse cardboard scraps and create something new and useful.
Recycled Tea Tin Planters
These cute and charming planters are a great way to reuse old materials and a stylish addition to any indoor or outdoor space. Simply clean out your old tea tins and remove any labels or stickers to get started. Then, fill them with soil and add your favorite plants or herbs. You can even decorate the tins with paint or other embellishments to make them even more beautiful.
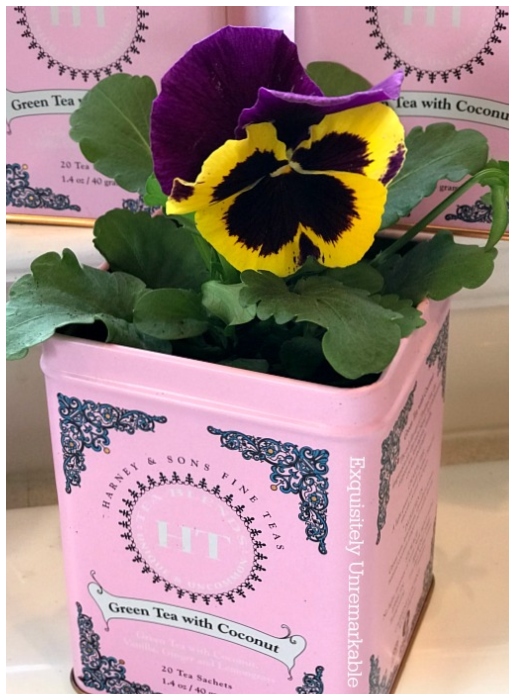
These planters are perfect for small spaces or those who want to add greenery to their home without taking up too much room. And the best part: You’ll do your part to reduce waste and help the environment. So why not give this fun and easy project a try? With some creativity and old tea tins, you can create charming, unique planters that are both eco-friendly and stylish.
DIY Driftwood Planter Made With Cedar
While real driftwood can be hard to come by, repurposing a cedar tree stump can have a similar effect. To get started, you’ll need to hollow out the center of the cedar stump and add some soil. Then, choose your favorite succulent plants and arrange them in the soil, adding decorative rocks or other natural elements as desired.
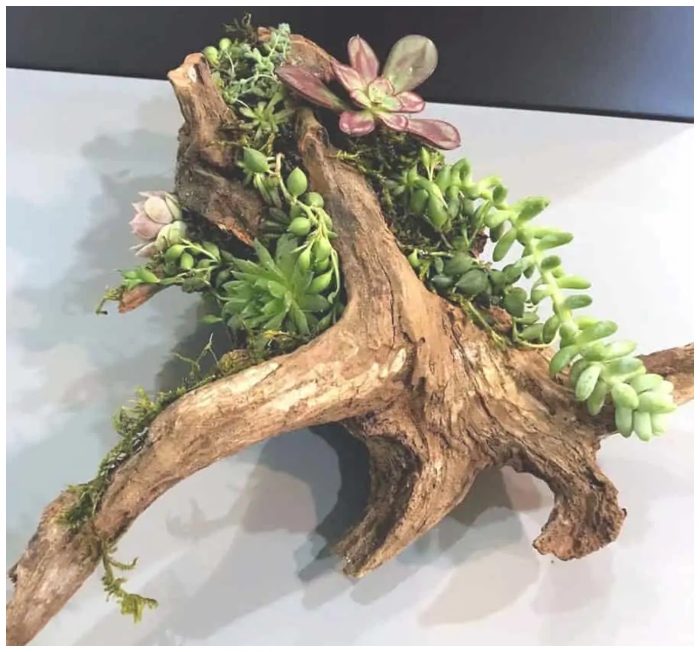
The result: a stunning and unique planter that will add charm and personality to your home or outdoor space. And the best part? You’ll do your part to reduce waste and help the environment by repurposing an old tree stump. So why not give this fun and easy project a try? With some creativity and repurposed cedar wood, you can create a beautiful, eco-friendly driftwood planter that’s sure to impress.
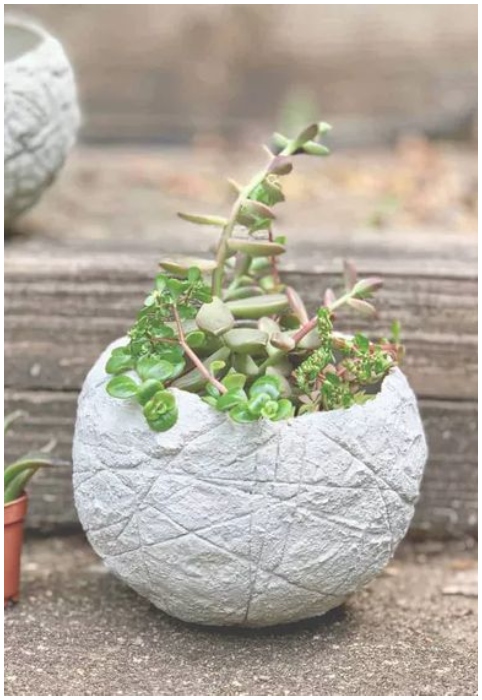
Easy DIY Cement Egg Planters For Easter
These unique and charming planters are not only easy to make, but they also make incredible decorations or party favors. You’ll need some egg-shaped molds, cement mix, and other supplies to get started. Once you have your materials, simply mix the cement according to the instructions and pour it into the molds. You can add some decorative elements, like stones or other embellishments, to make them even more beautiful.
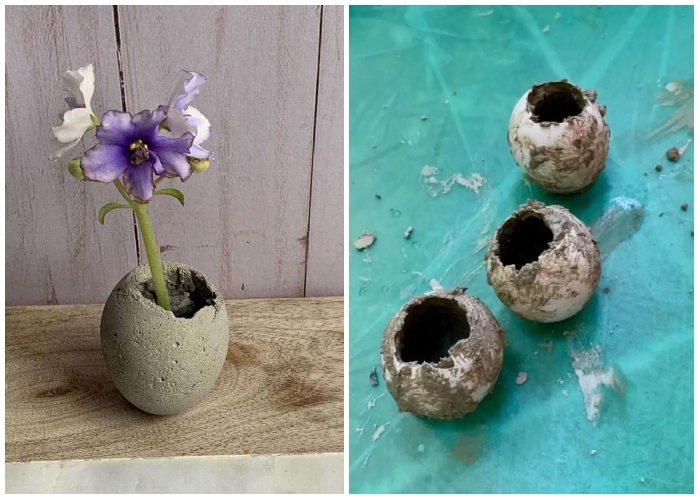
The finished product: a stunning and unique planter that’s perfect for succulent plants or other small herbs. And the drain holes allow for proper drainage so that you can enjoy your plants for weeks. So why not give this fun and easy project a try this Easter? Whether decorating your home or throwing a party, these DIY cement egg planters will impress.
Birch Hanging Air Plant Holder DIY
This easy-to-make planter is a great way to add some greenery to your home and makes a beautiful piece of wall art for plant lovers. You’ll need some birch branches, twine or string, and your favorite air plants to get started. Simply cut the birch branches to size and tie them together with the twine or string, leaving enough space to hang your air plants.
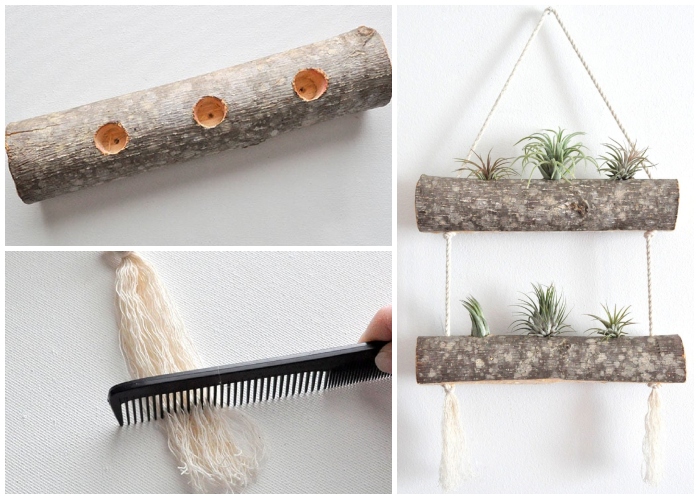
The finished product: a stunning and rustic planter that’s perfect for air plants or other small succulents. And hanging it on the wall adds a unique and stylish touch to any room in your home. Give this fun and easy project a try. With some creativity and natural materials, you can create a beautiful and unique birch hanging air plant holder that’s sure to impress.
Watering can
We can quickly determine if you are cool based on how you react to the image below. You’re cool if you like sprinkler plants. We believe you have all the information.
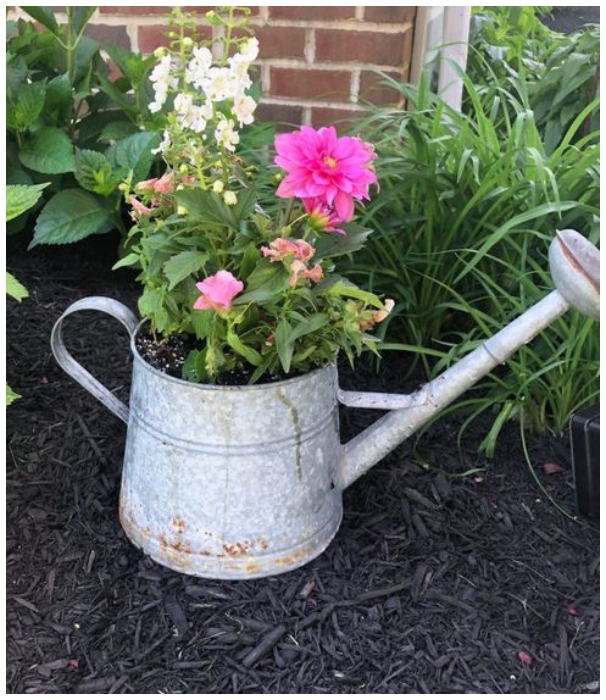
If you have a large garden and would like to grow it again but lack the time or energy, you can make a mini-garden using your favorite tool, your watering can. It’s so adorable.
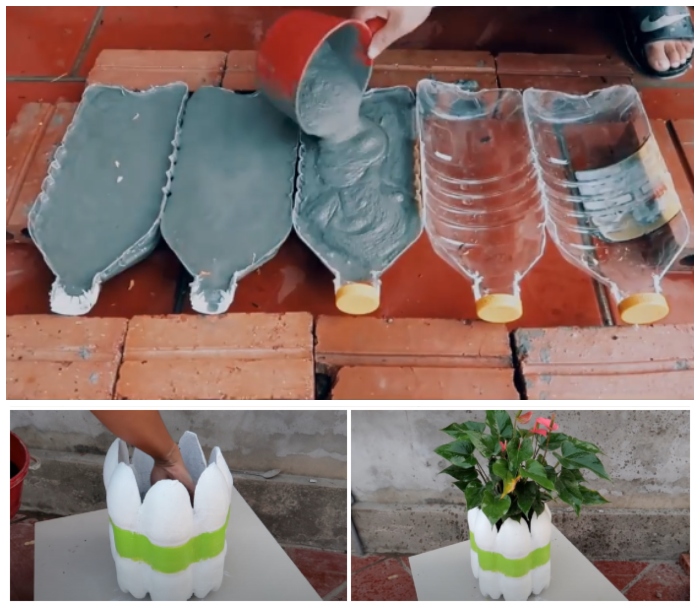
DIY Cement Planters Using Plastic Bottles
If you’re looking for a creative way to recycle plastic waste and add unique charm to your home or garden, this DIY cement planter project is the perfect weekend craft. With just a few plastic bottles, some cement, and a splash of paint, you can create a sturdy, colorful planter that looks store-bought—but is 100% handmade. Here’s how to make your own step by step:
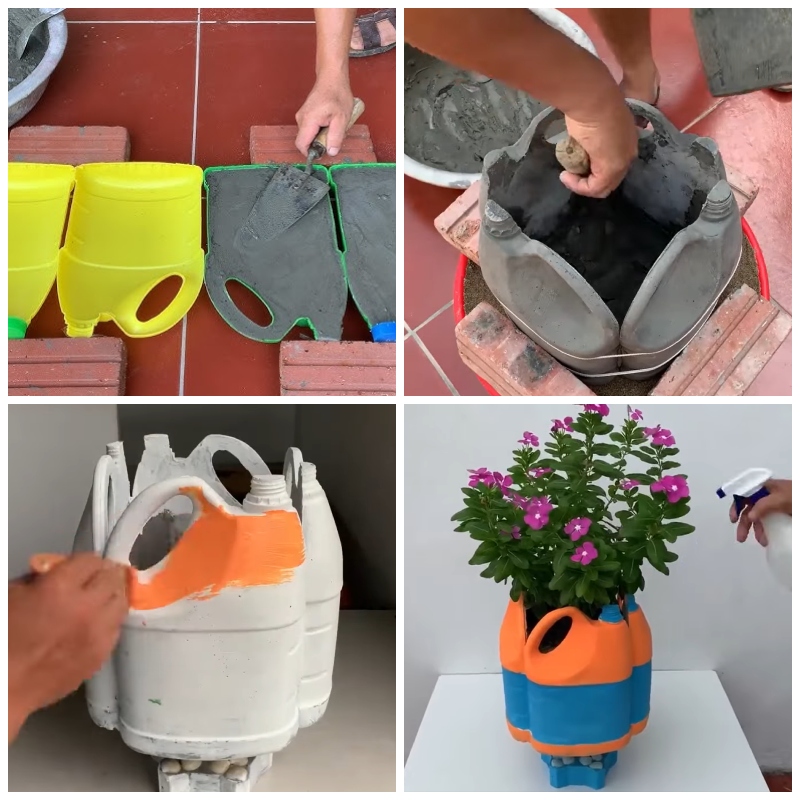
1. Cut and Prep the Bottles: Start by cutting large plastic bottles in half vertically. These halves will serve as molds for your cement. Place them upright on bricks to stabilize them while you work. 2. Apply the Cement Layer: Mix the cement until it reaches a smooth, spreadable consistency. Use a trowel to press and spread the cement inside the plastic molds, making sure the layer is even and firm. 3. Assemble the Mold Base: Arrange several whole plastic bottles in a tight circle and pour the cement mixture inside to create the planter’s base and walls. Secure the mold with bricks on the sides to help it hold its shape as it sets. 4. Let It Dry and Paint: Once the cement has fully dried, remove the plastic molds. Smooth out any rough edges and start painting—use a white base coat first, then add your favorite colors for a bold, vibrant finish. 5. Add Plants and Display: Fill your new cement planter with potting soil and your favorite flowers or greenery. It’s a beautiful and sustainable way to brighten up your home, porch, or garden.
Transform a Plastic Barrel into a Stunning Planter with this DIY Project
Materials: Plastic barrel, wood planks, brad nails, mesh screen, scrap wood. Tools: Jigsaw, cordless drill, miter saw, brad nailer, hammer. Step-by-step guide: Step 1, Cut the Barrel – Use a jigsaw to remove the top or divide the barrel into two smaller planters. Step 2: Deburr and Drill – Smooth the cut lip and drill multiple drainage holes at the bottom. Step 3: Attach Skids – Create two 2×4 skids and secure them to the barrel bottom for easy positioning. Step 4: Prep Wood – Revitalize salvaged wooden slats and scrap wood by planing, ripping, and chopping.
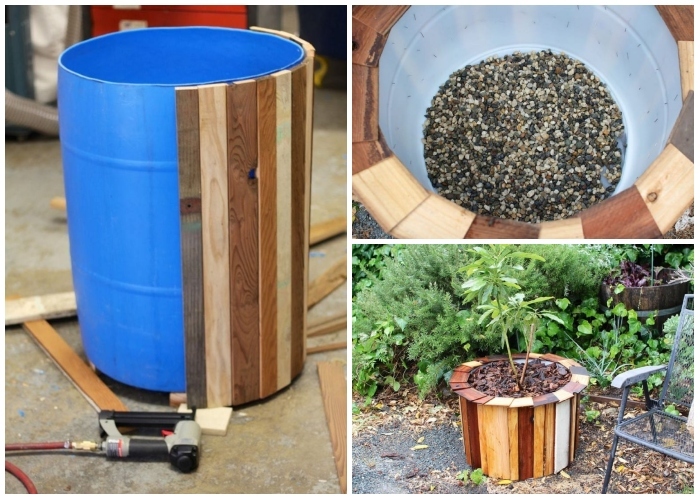
Step 5: Nail Slats – Cover the barrel in contrasting wooden slats with an air-powered brad nailer. Step 6: Secure Slats – Bend the exposed brad ends inside the barrel to lock boards and protect hands. Step 7: Create the Rim – Craft an octagon or sunburst pattern for the top using scrap wood, brads, and glue. Step 8: Add Screen and Pebbles – Cover large bottom holes with window-screen material and small pebbles. Step 9: Fill planters with a container-friendly soil mix, plant your flora, and add wood chunks or mulch. Step 10: Preserve – Apply a water-based exterior polyurethane or varnish coat to prolong planter life.
DIY Tire Frog Planter
Leap into upcycling with this whimsical DIY Tire Frog Planter for your garden! Transform an old tire into a friendly frog that doubles as a playful planter. What you’ll need: a spare tire, some non-toxic green paint, and a bit of creativity. Paint the tire green, add some big googly eyes, and a bright red smile.
<
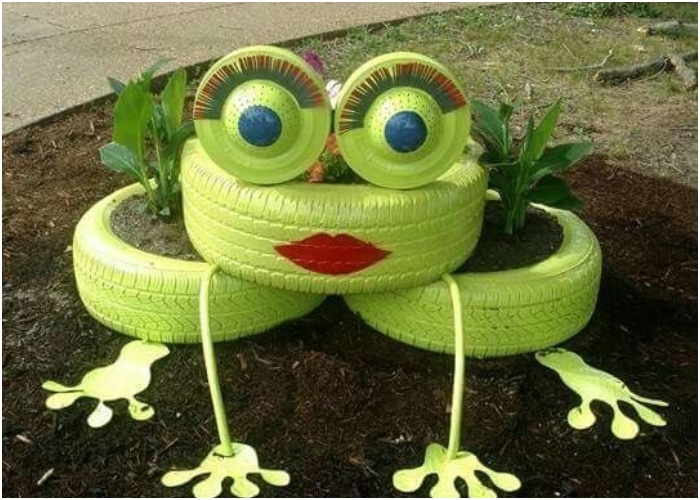
Once dry, position your tire frog and fill the center with soil and your favorite flowers or herbs. Not only will this tire frog add charm to your backyard, but it’s also a great way to repurpose and beautify with a personal touch.
Placemats Decor Hack
In 10 minutes, you can transform those bland planters into eye-catching decor pieces using placemats. Let’s get started with prepping the placemats! I found these fantastic placemats at Pier One Imports for only $3 each. Since one placemat wasn’t large enough to wrap around my planter, I combined two.
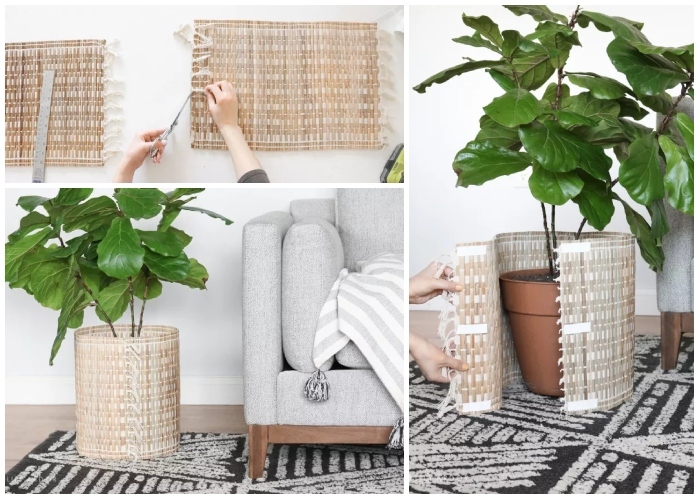
To continue, follow these steps: keep the tassels on one side for added flair but cut them off where needed to connect the two placemats. To join the placemats, we used some floral wire. Next, grab some Velcro to make this project work. We initially bought Velcro tape at Joann’s, but the adhesive was weak, so we resorted to hot gluing the Velcro pieces to the ends of the placemat. And that’s it! Just wrap the decorated placemat around the planter and secure it with Velcro. It’s that easy and incredibly stylish! 🙂
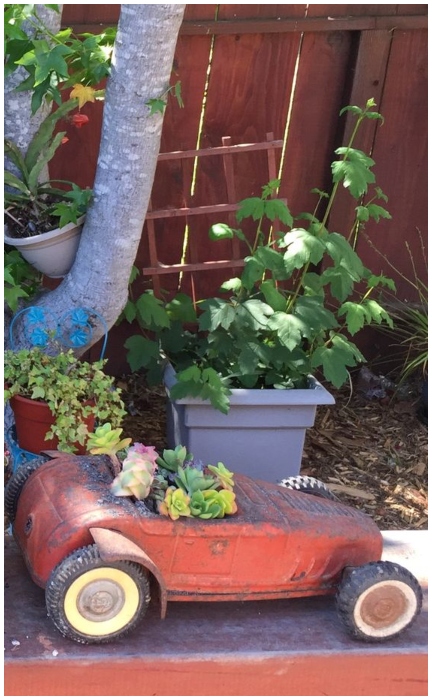
Vintage Toy Car Planter
Transform an old toy car into a charming and whimsical planter with this DIY project. Begin by selecting a sturdy, vintage toy car; metal ones work best for that rustic look. Clean it thoroughly, removing any dust or debris. Next, drill a few drainage holes in the bottom to ensure your plants will have adequate drainage. This is crucial for preventing root rot and keeping your succulents healthy.
Easy DIY – Cement Balloon Planters
Materials: 7″ round balloons, cement mix, nitrile gloves, wire mesh strainer, plastic mixing bowl, plastic grocery bag, measuring cup, Q-tips, large sponge, succulent soil, succulent plants. Step 1: Inflate the Balloon – Inflate your balloon to the desired size, keeping in mind that the finished piece will be larger due to the thickness of the cement. Step 2: Set Up the Balloon – Cover a mixing bowl with a plastic grocery bag and place it in a wire mesh strainer.
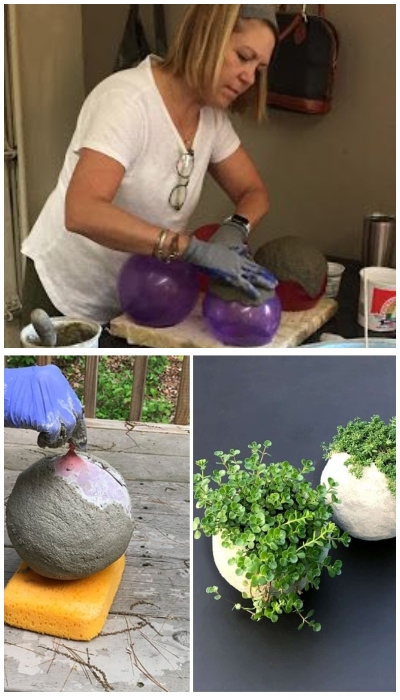
Step 3: Mix the Cement – Mix the cement slowly, adding more until it has the consistency of cake frosting. Step 4: Mold the Balloon with Cement – Start molding the cement on the top of the balloon and work your way around, shaping and smoothing as you go. Step 5: Mold the Other Balloon End and Create Drainage Holes – Use a Q-tip to press a few small holes for drainage. Step 6: Pop the Balloon. Step 7: Reinforce the DIY Cement Planter. Step 8: Plant Your New Cement Balloon Planter
Making Cement Flower Pots from Plastic Bottles
Breathe new life into discarded plastic bottles by transforming them into charming flower-shaped cement planters. Step 1: You’ll need a few plastic bottles (different sizes work best), a utility knife, scissors, a permanent marker, cement mix, water, a mixing container, a trowel, sandpaper, acrylic paint, and a paintbrush; Step 2: Cut each plastic bottle lengthwise into two halves. Using the permanent marker, draw petal shapes around the cut edges. With scissors, carefully cut along the lines to create flower petals. Bend the petals outward to give them a natural, curved appearance. You’ll use these halves as molds for your cement planter.
Step 3: Following the instructions on the cement mix packaging, combine the cement and water in the mixing container. Stir until you achieve a smooth, thick consistency. Pour the cement mixture into the plastic bottle halves, filling each one about halfway. Gently tap the molds to remove any air bubbles and level the cement; Step 4: Allow the cement to set according to the recommended time on the packaging. Once the cement is firm, carefully remove the planter from the plastic mold by cutting away the plastic bottle. Use sandpaper to smooth any rough edges; Step 5: Using acrylic paint, color the cement petals in vibrant shades that complement your garden or home decor. You can choose a single color or experiment with gradients and patterns. Allow the paint to dry completely. Place the halved cement planters on a flat surface, arranging the petals in an alternating pattern to form a complete flower shape. Fill your new flower-shaped cement planter with your favorite plants or flowers.
Create a Stunning Swan-Legged Coffee Table
Add a touch of elegance to your living space with a DIY coffee table featuring swan-shaped legs made from cement. Using styrofoam molds, you can create a unique and eye-catching piece. Step 1: Gather materials like styrofoam blocks, a carving knife, cement mix, water, sandpaper, primer, paint, a tabletop, and adhesive. Step 2: Sketch a swan profile on each styrofoam block, and carve the shapes for cement molds. Step 3: Combine cement and water, and apply the mixture to the styrofoam swan molds. Allow the cement to set.
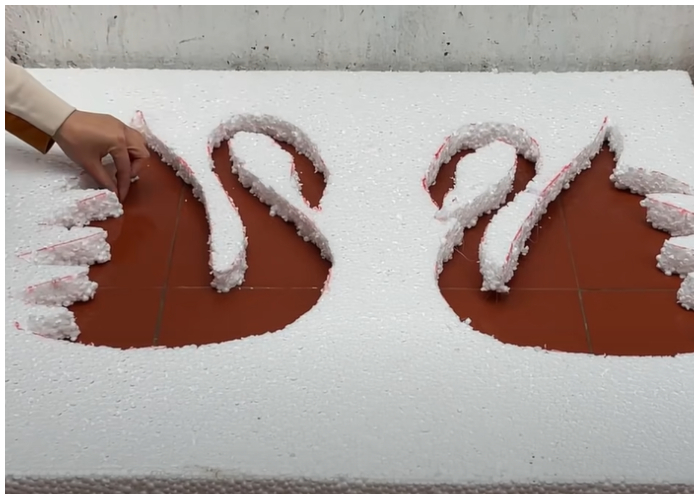
Step 4: Remove the styrofoam and smooth the cement swan legs with sandpaper. Step 5: Apply primer, and once dry, paint the swans in your desired color or finish. Step 6: Position the cement swan legs, apply adhesive to their tops, and attach the tabletop. Let the adhesive dry before using the table. Enjoy your elegant and eye-catching coffee table!
DIY River Stone Planter
Get ready to unleash your inner artist and create stunning river stone planters that will leave everyone in awe. Perfect as heartfelt Mother’s or Father’s Day gifts or as an exciting family activity, these planters are a breeze to make and a joy to admire. Here’s what you’ll need for this thrilling DIY journey: A pot or planter Remember, the treasure could be hiding in your storage!); Cement (Opt for ready-mix concrete); River stones (I struck gold at Dollar Tree with a $1 bag of stones, but craft stores or nature walks by rivers and lakes are also great hunting grounds).
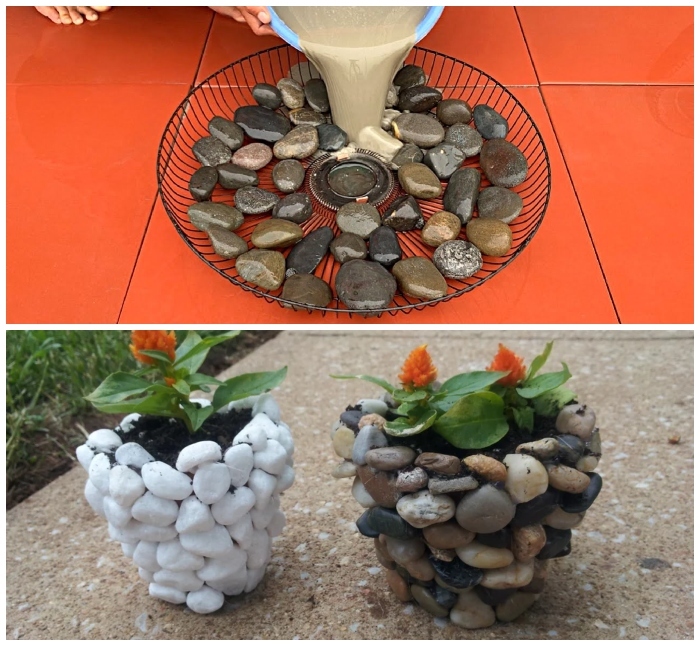
And for the grand finale: A captivating flower and some potting soil to bring your masterpiece to life! Embrace the challenge of solving the ultimate 3D puzzle as you meticulously glue river stones onto your pot with cement, one by one. Relish the satisfaction of discovering the perfect shapes and sizes to fill each gap. Once the stones are in place, waste no time transforming your planter into a breathtaking floral haven. Your new river stone planter will be a testament to your creativity and a beautiful addition to your home or garden.
Transform an Ordinary Basket Into a Stunning Flower-Designed Pot
What You’ll Need: A plastic basket (preferably one with a floral or lattice design); Cement mix (quick-setting); Water; Mixing bucket; Trowel or spatula; Plastic wrap or a plastic bag; Cooking spray or petroleum jelly; Gloves; Sandpaper (optional); Paint and paintbrush (optional). Step 1: Start by cleaning the plastic basket and removing any labels or stickers. Spray the inside of the basket with cooking spray or apply a thin layer of petroleum jelly. This will make it easier to remove the cement once it has been set; Step 2: Put on your gloves and follow the instructions on the cement mix package to create the right consistency. Be sure to mix enough cement to fill your plastic basket mold.
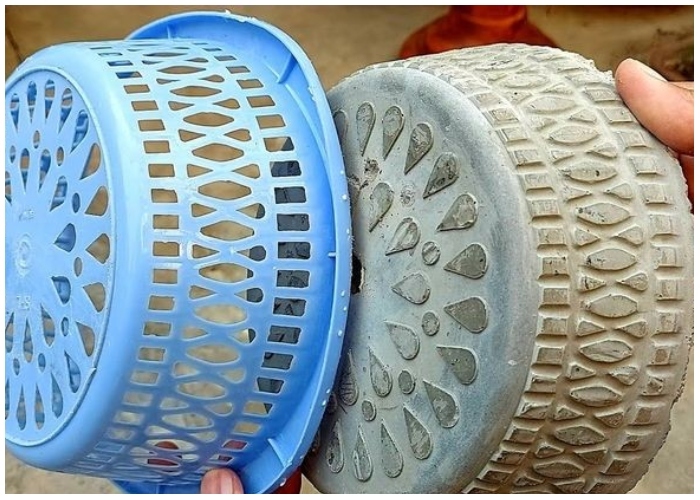
Step 3: Carefully pour the cement mix into the plastic basket, filling it to the desired height. Gently tap the sides of the basket to remove any air bubbles and to help the cement settle; Step 4: Cover the filled basket with plastic wrap or a plastic bag to prevent the cement from drying out too quickly. Leave the basket undisturbed for at least 24 hours; Step 5: Once the cement has set and is completely dry, gently flex the plastic basket to loosen it from the cement. Carefully remove the basket, revealing your beautiful flower-designed pot!; Step 6: Use sandpaper to smooth any rough edges on your flower pot if necessary. For an extra pop of color and personality, paint your pot with weather-resistant paint, creating a design that complements the floral pattern.
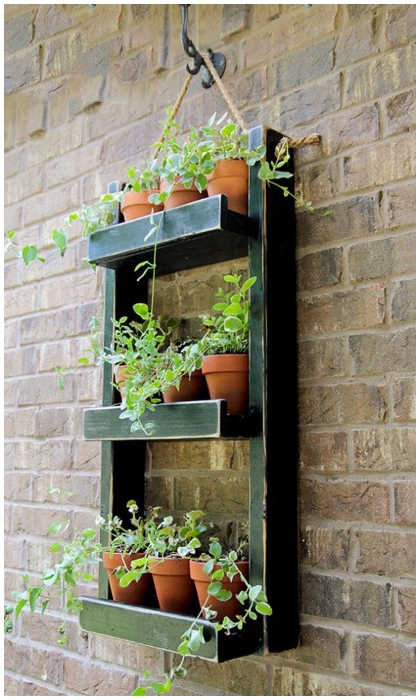
Build Your Own DIY Vertical Garden Wall
Materials: Ground spikes, cedar posts, cedar planks, scrap 4×4, lag bolts, wire netting, fence staples, steel wire, terra cotta pots, plants, and potting soil. Step 1: Check for underground utilities. Step 2: Mark and insert ground spikes.
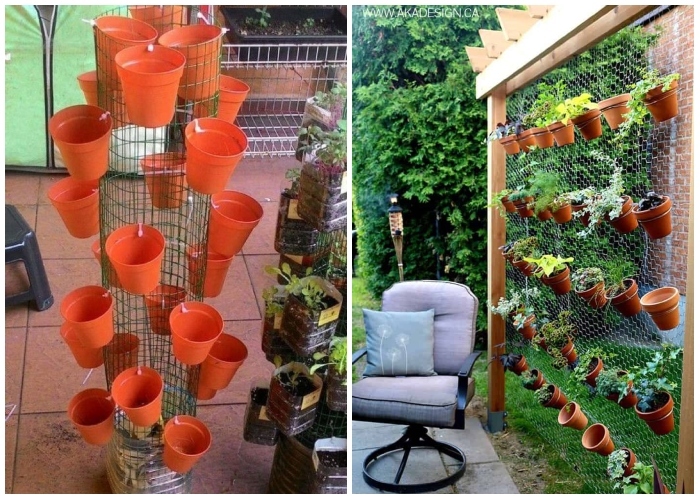
Step 3: Cut and install cedar posts. Step 4: Attach cedar planks to posts and secure them with bolts. Step 5: Cut and angle arbor pieces and attach them to planks. Step 6: Secure wire netting to planks and posts to form a wall. Step 7: Transplant plants into terra cotta pots. Step 8: Cut and wrap wire around pots, then attach to wire netting wall.
Stunning Marble Planters
Do you feel bored with your pots? Use rubbing alcohol, ink, or white paint to give your pots a new life. This hack is straightforward to implement and will yield amazing results.
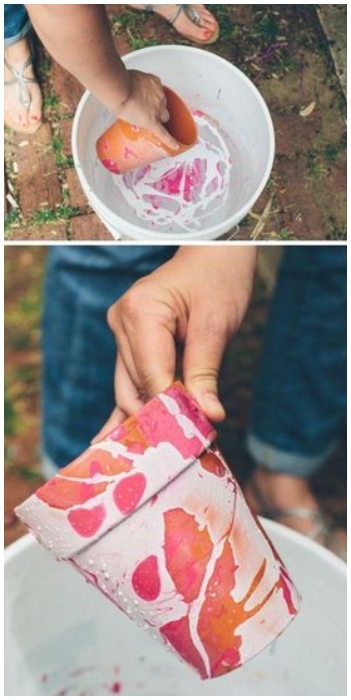
Here’s how you do it: apply a solid color to your potted plants, but preferably one that is not too dark. This will allow the final effect to shine through. Spray some rubbing alcohol on the planter and then spray some ink on it. Stunning, isn’t it?
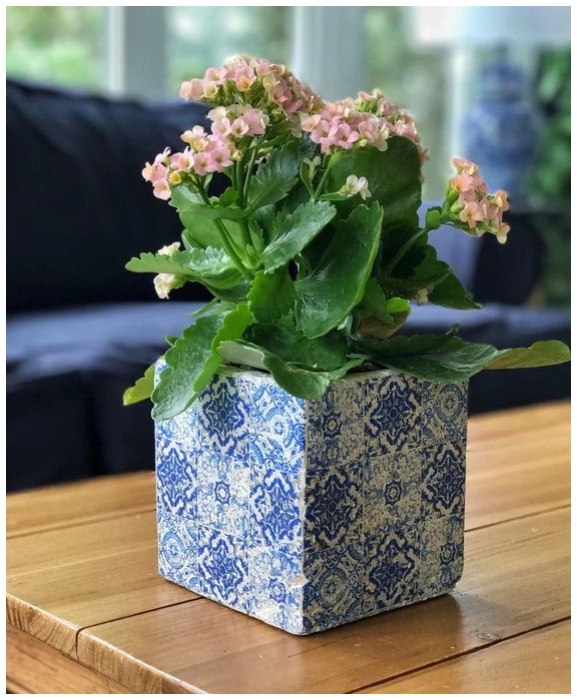
Sophisticated Geometric Planters
You just realized that you have lots of cardboard scraps in your garage. Or maybe you have pencil holders you forgot about. These things shouldn’t be thrown out. Get some sandpaper and start sanding. Paint or spray paint whatever color you wish.
After they have dried, you can place them on any wall, table, or floor you wish, and the plants within them will look amazing. You have the option to choose a bright, metallic, or pastel shade.
Back to the 80s
You may be a fan of 1980s pop culture. This includes style, fashion, plants, and furniture. That is something we respect. These funky designs and dots can be created with only black and bold colors.
Now it’s time to call that artist hiding inside of you if you have been waiting for the right moment to unleash your creativity! Allow your creativity to flow, and you can paint cheap ceramic in pink, black, cyan, or any other color that appeals to your artistic eye!
Clothes from the Olden Days
Let’s say you suddenly realized you have a lot of old graphic t-shirts in your closet. You also became a bit obsessed with plants this week. We understand. Let’s have some fun, so grab your sharpest scissors.
You will also need to ruin your old clothes. This is not something for the faint-hearted. To create a web: cut your shirts into strips and tie them together to create a web design. You can now balance the plant you wish to give a new home in your created web and hang it from the ceiling.
Turn a Mannequin into a Unique Planter
Have you ever wondered what to do with a mannequin head? Maybe you’ve seen one in a thrift store or online and thought it would be the perfect addition to your home decor. Well, we’ve got a super cool idea for you! First, you need to get your hands on a mannequin head, and if you know where to find one, please let us know too! Once you have the head, you need to hollow it out to create a unique and eye-catching planter. Fill it with soil, seeds, and water, and give your plant tender love and care under the sunshine.
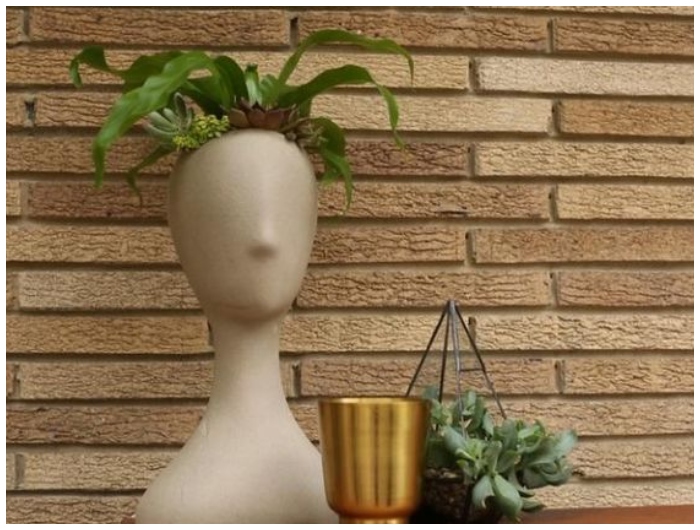
The best part: if you’re lucky, you might even see a seed germinating through the ear or nostrils of the mannequin head, giving it a truly unique and surreal look. Imagine having a beautiful plant growing out of a mannequin head planter, becoming the center of attention in your home. So don’t let that mannequin head go to waste! With creativity and some green thumbs, you can turn it into a one-of-a-kind planter that will have your friends and family talking. Happy DIY-ing!
Upcycled Boots
Most of us grew up with these rain boots, and most of us don’t use the ones we used when we were little. These boots can be easily upcycled and used to decorate your home with additional pieces.
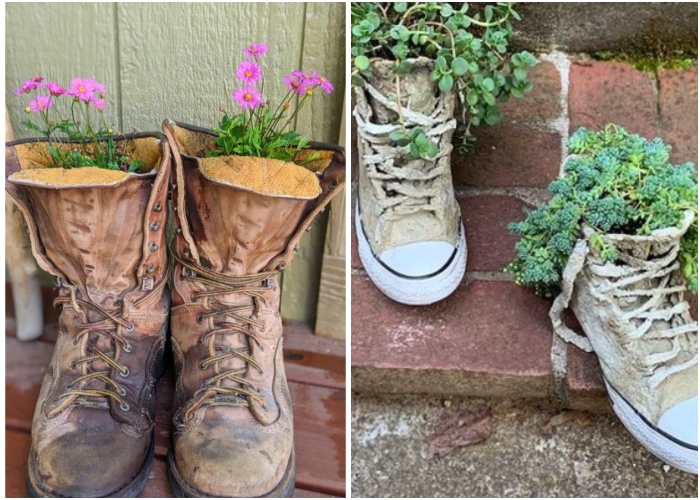
Remember: you need to make small holes in the sole of your shoe, and only then you can add soil to the boot. After that, plant a few seeds or flower cuttings and watch the boots bloom while you water them. These boots are so beautiful!
Buckets Hack
Although it may seem confusing, once you learn how it works, you’ll realize why this is the best hack. You will need some wall hangings and stitched bowls. And your favorite plant.
The bowl should be mounted on the wall at an angle so that one side is parallel to the ground. Keep in mind: This might require the top to lean forward. Next, place your potted plants on the bucket’s bottom so they can pop out.
Live Fence with Silos
You don’t need a fence or cement block to define your house’s boundary. You can make something that looks like half silos or uses scrap metal sheets and wrap them around a big planters frame.
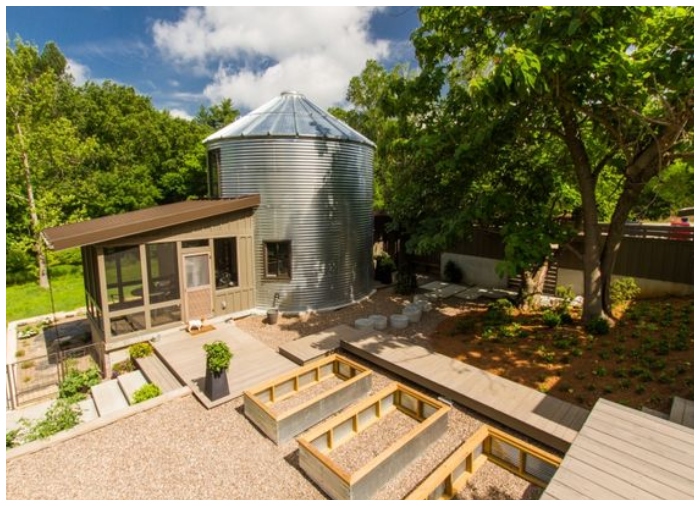
Spray paint them any color you choose, then fill them with soil, flowers, and saplings. It’s nice to know: They will thrive in the sun and rain, so you won’t have to care for them much if they are properly watered.
Hangers for Plants
We get it. We all have extra hangers. You shouldn’t let them rot in your closet since they are as ambitious as us. If they’re not worn for clothes, put them somewhere else!
As you may have guessed by the general theme of this list, planters are one example. Hangers for plants: You can bend most steel hangers to any shape you like. You can use this to your advantage for your plant’s dream! Add hooks and decorate your ceiling with Cactus and Succulents.
Donut-Shaped Planters
Do you want something simple and quick to make? Something that is beautiful and soft to the touch? As always, we have you covered. All you need are a circular mold and cement.
This addition, which is shaped like a donut, would look great on the rims of existing planters or on top bowls to allow the plant to exit as it grows taller. For the adventurous: You can also make two pots and make them the main body.
Breath Life Into a Boring Bottle
Let’s talk about turning a boring bottle into a fun art piece! If you’re a fan of bright colors and cute animals, why not transform the neck of the bottle into a little pig’s snout? But that’s not all – let your imagination run wild and turn any gallon-sized bottle into your favorite animal, car, or train.
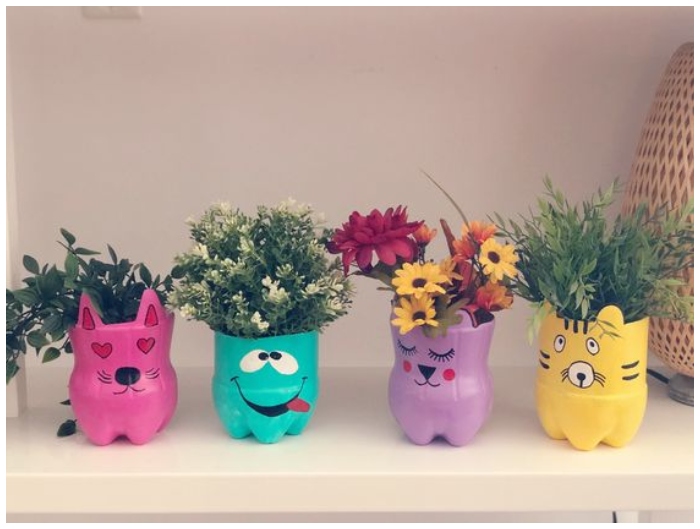
The possibilities are endless! It adds some whimsy to your garden or backyard and is also a fun project to do with kids. So grab some paint, and let’s get started on this easy and creative DIY idea!
DIY Succulents Baked Planter
Looking for a creative and unique way to showcase your succulents? Look no further than this DIY Baked Planter! All you need is some clay or polymer and an oven to create a one-of-a-kind planter that’s both simple and elegant.
Warm up the clay in your hands, shape it to your liking with a knife and spoon, and bake until it hardens. Add some paint for extra flair, or keep it natural for a minimalist look. Final step: fill it with soil and your favorite succulents to create a cool and stylish addition to any room in your home.
Mixed Plants Drawers
We recommend buying a second-hand chest of drawers if you don’t own one of these types or smaller ones but still want to make this work in your living room. If you wish to paint, all that is required is to sand down the edges and surfaces before painting. You can also replace the knobs to match your style.

Once you have sorted that, arrange the plants according to their needs. Some inspiration: some people have a chest with drawers that are horizontally laid on the ground, filled with lemongrass grown to a height of knee-high. It is heavenly, and we cannot recommend it enough. It’s worth a try!
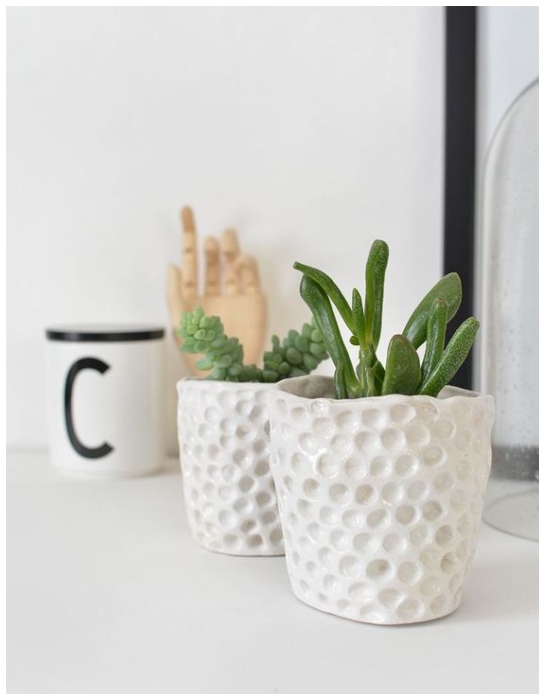
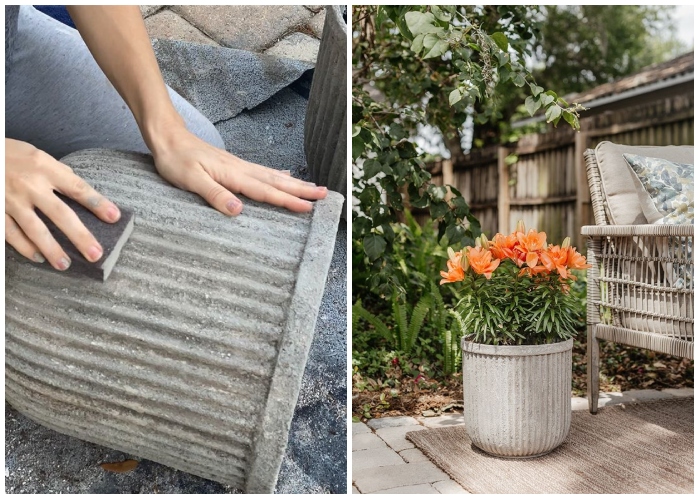
Textured Cement Planters
Cement planters are great and all, but let’s be honest – they can be pretty dull. If you’re tired of the same old texture, we’ve got a fun and easy hack for you! All you need is a comb or fork to add some texture while the cement is setting.
Don’t worry: you don’t have to be a skilled artist – simply poking the wet surface can create some cool raised dots and patterns. Once you’ve painted it to your liking, it’s time to add some plants and let them thrive in their unique new home!
DIY Burlap Planters: Give Your Plants a Rustic Makeover
Grab whatever cloth you have at hand. This does not mean that you should use what you currently wear, but what is closest to you. This hack can be used with any type of scrap cloth you have!
It should be as large as the plant, so cut it into a sun shape consisting of small spikes and a big circle core. Important: before adding soil, gather the ends and tie the cloth around a can or pot.
Wall Hanging Planters
Wall hangings are a great idea. Do you have the confidence to water your hanging plants regularly and not view them only as decorative items? This is the right time to add it to your home decor!
Options: This project can be done with either plaster, cement, or a simple taped-up mold or frame. Be careful when using sharp objects and sandpaper. We are eager to see your beautiful plants.
The Upside Down Planters
There are many beautiful wrapping paper and wallpaper options. However, if you’re like us, using good wrapping paper to protect your sensibilities from someone who might rip it apart can be detrimental.
Here’s an alternative: you can make a collage with your scraps of wrapping paper and cloth. This hack is best for climber plants. It doesn’t require much soil. Your house will look magical as the plant grows from your ceiling.
Paper Towels Rolls as Stylish Containers for Indoor Plants
Do you have any paper towels lying around? You know, the ones that come in those brown and white rolls you use to clean up spills and clean down counters. Well, we’ve got a cool DIY idea for you! Instead of tossing those empty rolls or even plastic bags of the same color, why not weave them together to make a stylish container for indoor plants? It’s super easy, and the end result is a rustic, airy look that will make your plants look like they belong in a fancy home decor magazine.
All you need to do: weave the paper towels or plastic bags through each other to create a basket-like shape. You can experiment with different patterns and colors to make it look more unique. Once you’re done weaving, pop in your favorite leafy plant, and voila! You’ve got a beautiful planter that came straight from a fancy boutique.
Pants planters
We don’t know if we are like you, but we have a lot of jeans and other types of pants that we don’t wear or don’t like. Some of these might not be suitable for donation.
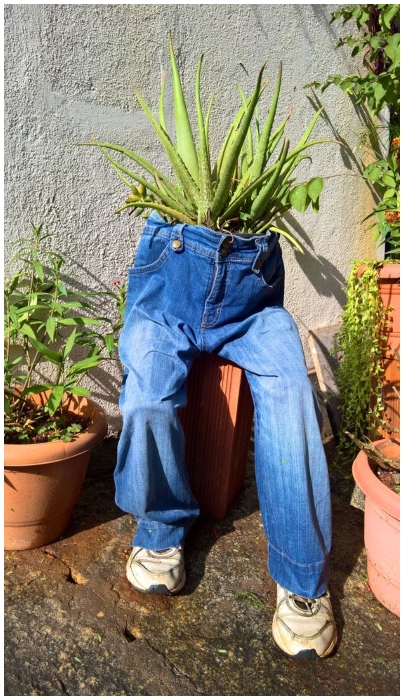
No worries! Here’s what you can do: to make your legs stable, you can use a mannequin’s leg, cement, wood, or a lot of plastic stuffing. Next, cover it with soil starting at the waist and plant your seeds. Add water once a week and keep it close to sunlight. It will make a cute and funny planter.
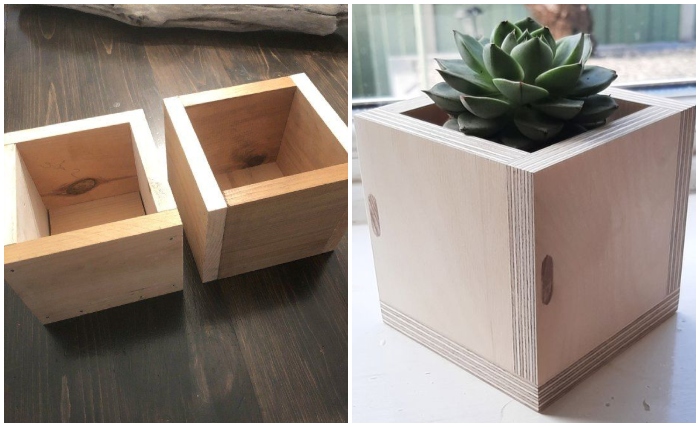
DIY Wood Planters
These drawers look great, and you’d be amazed at the prices if you went to Ikea or any other local store. Here’s the secret: these drawers are second-hand.

Here’s how to start: after removing the drawers from the interior, sand down the surface and add your soil. Make sure a few holes at the bottom allow water to seep out. Get some sunlight, and there you have it. Not to mention you can also make mini plants with smaller drawers.
Make Vertical Cinder Block Planters
This creative and practical idea is not only a great space-saver, but it’s also a fun DIY project. You’ll need some cinder blocks, potting soil, and your favorite plants to get started. Simply stack the blocks vertically, leaving space for the plants in the blocks’ holes.
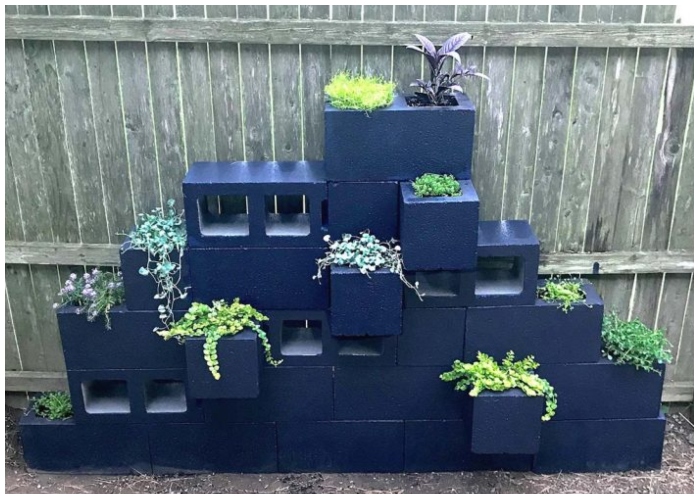
The result: a stunning and unique planter that’s perfect for small spaces or adding a greenery touch to your outdoor area. And the holes in the cinder blocks make it easy to plant various plants, including herbs, succulents, and even tiny flowers. So why not give this fun and easy project a try? With some creativity and cinder blocks, you can create a beautiful and practical vertical planter that’s sure to impress.
Repurpose Tissue Holders
These adorable little planters were actually tissue dispensers and holders at one time, believe it or not! You might also want to repurpose any ceramic or cement tissue storage containers as homes for your plants.
This is the easiest to do. First thing: A dispenser that is too heavy could tip over and cause the plant to fall, so the most important thing is to use the right weight and angle when installing it. Finally, match it to your aesthetic!
Ecological Tin Cans Planters
Do you feel angry or frustrated over something, but nothing seems to help? Are you open to ideas? Grab an empty can of food or any other empty can, and smash it a bit with your hands.
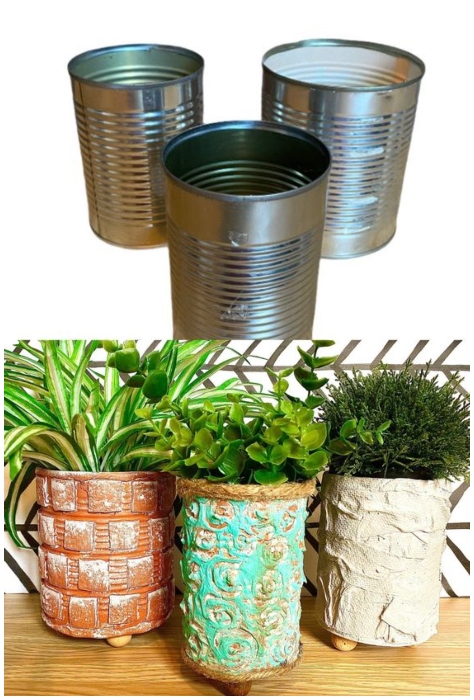
The best part: after getting it moving and doing enough “damage,” paint it with your favorite color, like metallic gold, as shown in the photo above. Give your plants some soil, water, and all the love you can!
For the Plants Who Deserve a Throne
You are mistaken if you believe only humans deserve a seat on the throne. Sitting on the ground or floor can have its benefits, but if you want to add some class and sophistication, elevate your plant.

What you need: a pale brown wooden stand with a matte finish. It’s not too blingy. This stand is easy to fit in any room and is very gentle on the eyes. This would make an excellent addition to any living room. Go ahead and try it yourself.
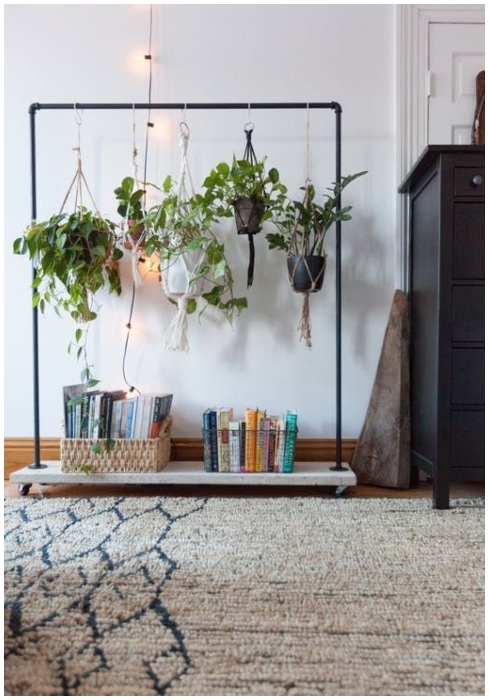
Elevate Your Greenery: DIY Plants Stairs for a Stunning Indoor Garden Display
Are you ready to take your plant game to the next level? Introducing the Plants Stairs, the perfect solution for organizing and showcasing your beloved greenery. Whether you want to create a tiered competition or simply give your plants an elegant new display, this metallic pipe and wire fixture is the answer.
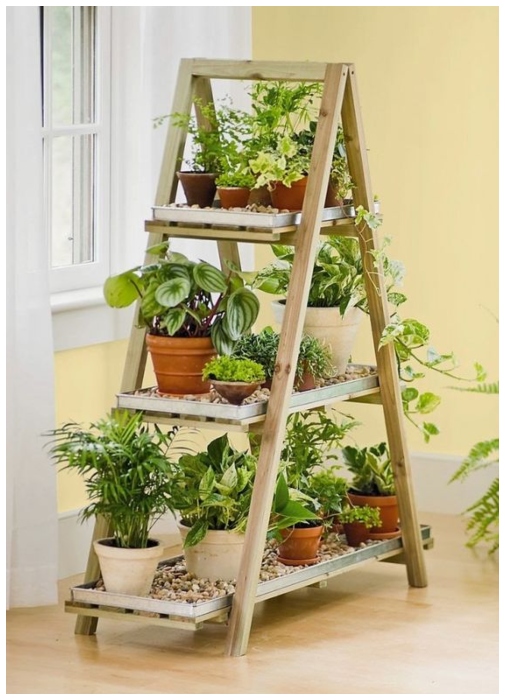
You can customize the arrangement to your liking and provide extra support to your plants while you can’t be there for them. In Addition: a great conversation starter and will make all your friends envious of your green thumb. You can DIY it using metal or plastic pipes or get one at the hardware store.
DIY Planter Box For Front Porch
A DIY planter box might be the perfect solution if you want to add a touch of nature to your front porch. These wooden planters are a great way to showcase your green thumb and add personality to your home’s exterior. Not only do they make a statement, but they also provide ample space for larger plants or even small trees. When selecting the right planter box, the options are endless. You can choose various designs, materials, and sizes to match your style and needs.
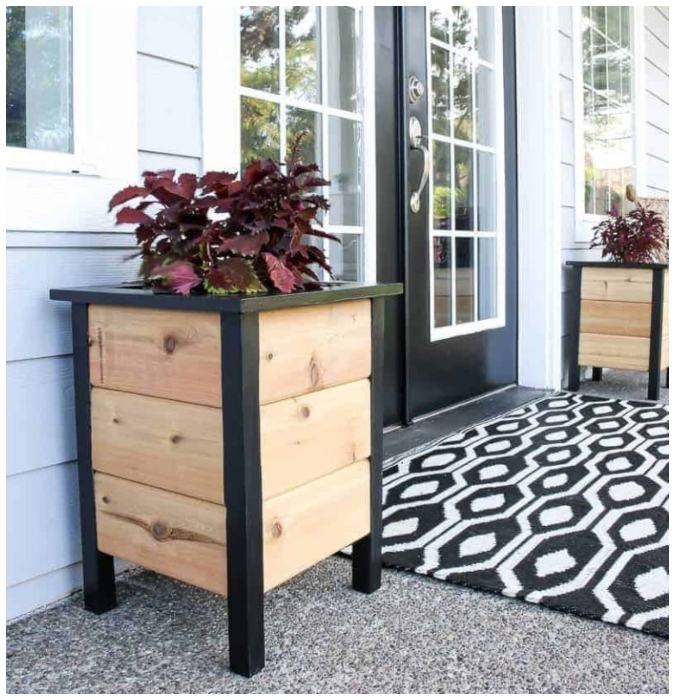
Whether you’re a seasoned DIYer or a beginner, plenty of plans are available online to help guide you through the process. In addition to the planter boxes: you might consider a tiered wood plant stand to add height and depth to your front porch garden. With some creativity and effort, your front porch can become a beautiful oasis that reflects your love for nature and adds curb appeal to your home.
DIY Hanging Grapevine Basket Planter
Looking for a unique and charming addition to your garden or outdoor space? Why not try making a DIY hanging grapevine basket planter? This beautiful and rustic planter is easy to make and a great way to repurpose wild grapevines or any other type of vine you might have in your yard. If you don’t have any natural vines, you can easily find them at your local craft store. Once you have your vines, you need a hanging basket and potting soil.
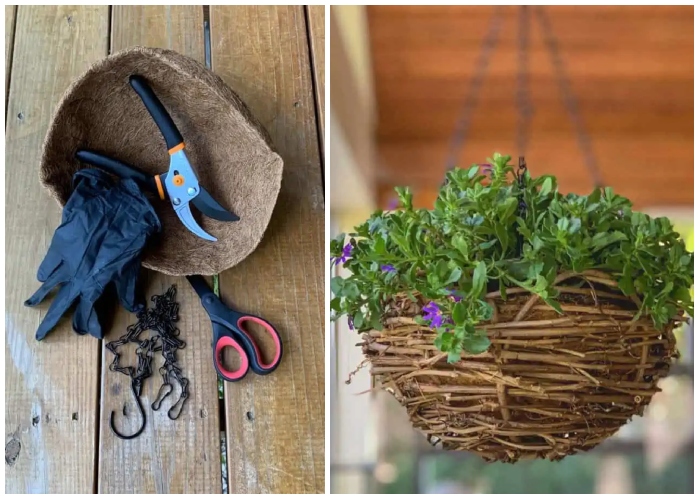
Good to know: This technique is relatively simple and can be done by anyone with patience and creativity. Once you’ve completed your planter, you can hang it up in your garden or on your porch and enjoy the beauty of nature right at home. So why not give this fun and unique project a try? You’ll be amazed at the beauty you can create with simple materials.
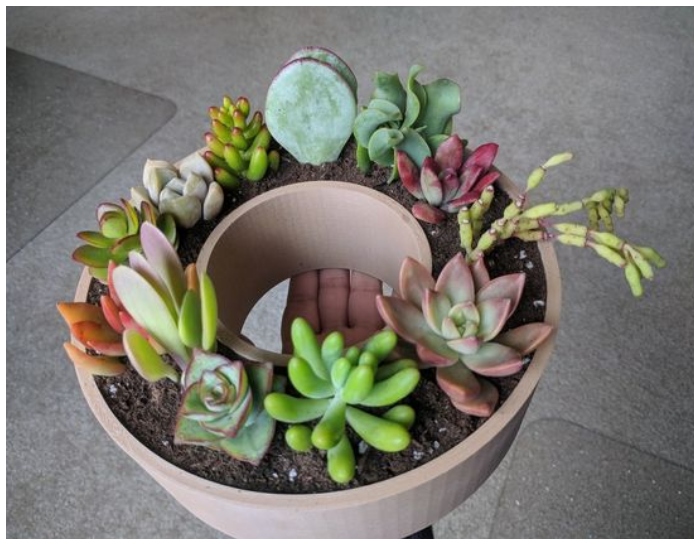
DIY Mini Succulent Garden (In A Tree Stump)
Why not try making a DIY mini succulent garden? This unique and charming idea is a great way to breathe new life into an old, unsightly stump. Hollow out the stump’s center and add some soil to get started. Then, choose your favorite succulent plants and arrange them in the soil, adding decorative rocks or other natural elements as desired.
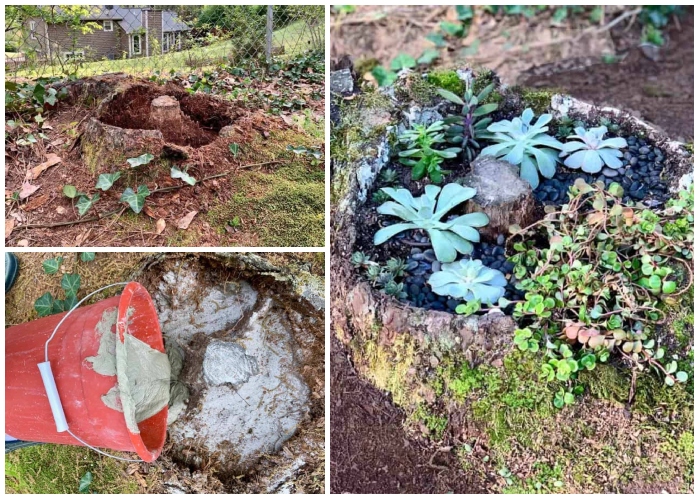
The result: a stunning and eye-catching garden that’s sure to impress. And the best part? Succulents are incredibly low-maintenance, making this project perfect for anyone who doesn’t have a lot of time or gardening experience. So why let that old tree stump go to waste? With a little creativity and effort, you can transform it into a beautiful and unique mini succulent garden that will add charm and personality to your outdoor space.
How To Plant An Herb Garden In A Galvanized Bucket
This simple and charming idea is a great way to add some greenery to your home while enjoying fresh herbs for cooking and other uses. To get started, all you need is a galvanized bucket, some potting soil, and your choice of herbs. Depending on your tastes and preferences, you can choose from various herbs, including basil, thyme, rosemary, and more.
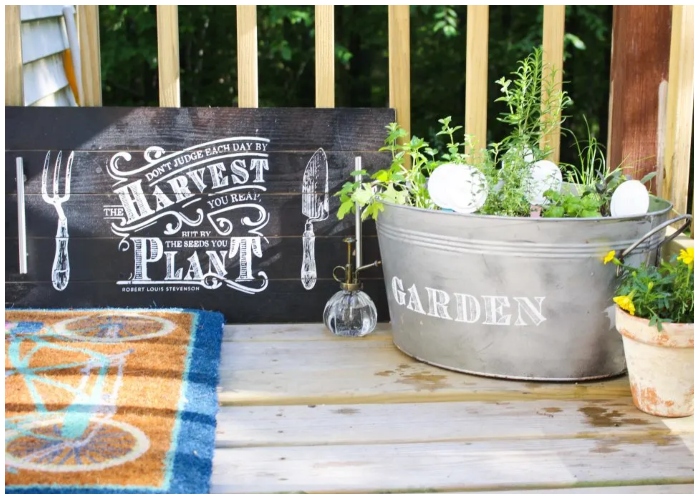
How to start: once you have your supplies, simply fill the bucket with soil, plant your herbs, and water as needed. You can add decorative elements, like stones or other natural materials, to make your herb garden even more beautiful. This project is perfect for anyone who loves gardening and cooking, as it allows you to enjoy fresh herbs from your backyard. So why not try it this spring and enjoy the beauty and flavor of your herb garden?
Always Classic: Skinny and Long Planter
Do you love potted plants and the atmosphere they bring but don’t have enough space to house cute and sleek indoor plants? We’re here to tell you that a rectangular shape is possible!
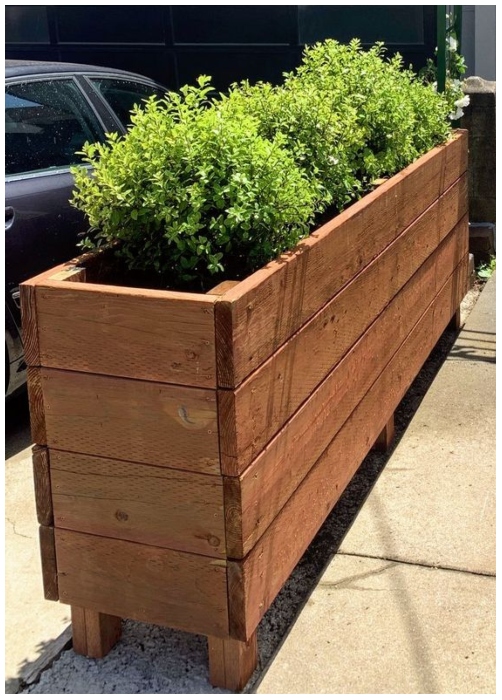
We are not talking about a cute person with long legs, broad chests, and spiky hair. Keep in mind: The right plant decor will elevate your living space without occupying too much space in the middle or corners of the room.
Rustic Design With Semi Circular Planters
In case you were wondering, the sphere that appears to be going into this wall is actually a hemisphere. The back of these adorable little planters is flat, so it can be easily hung on any wall or surface.
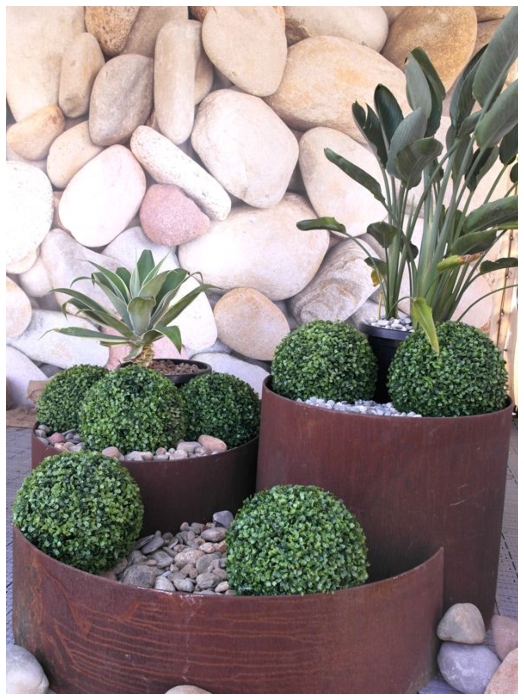
The perfect way to design your kitchen’s entrance is to contrast the white pots with the dull brown ropes in varying colors on a dark blue-ish wall. Another option: decorate your home entrance above the keys’ bowl to match their aesthetic.
Tiny Seat for Tiny Plants
You might not be able to give your plants a proper seat if they are too close to your eyes. You might also find that your plants are very small and need a suitable seat. No worries!
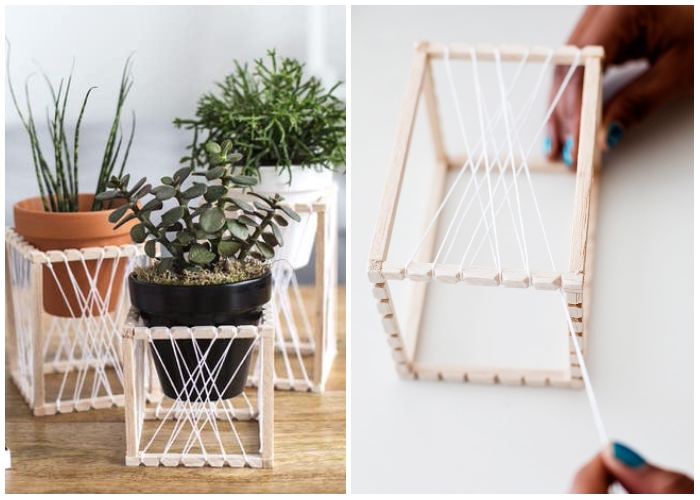
You will need: some thin rope and wooden blocks. Use a shoelace design that can be used around wood blocks. Then, you can start creating perfect cage-like patterns for your plants. It’s like a hammock to your succulents! These little ones will look great in the bathroom or on your nightstand.
Hands Shaped Plaster/Mold
Make sure you have a large bucket or tub to accommodate your arms. As seen here, you can add silicone mold liquid to the bucket while your hands stay in this “offering” pose. Once the silicone has set, add your plaster or cement.
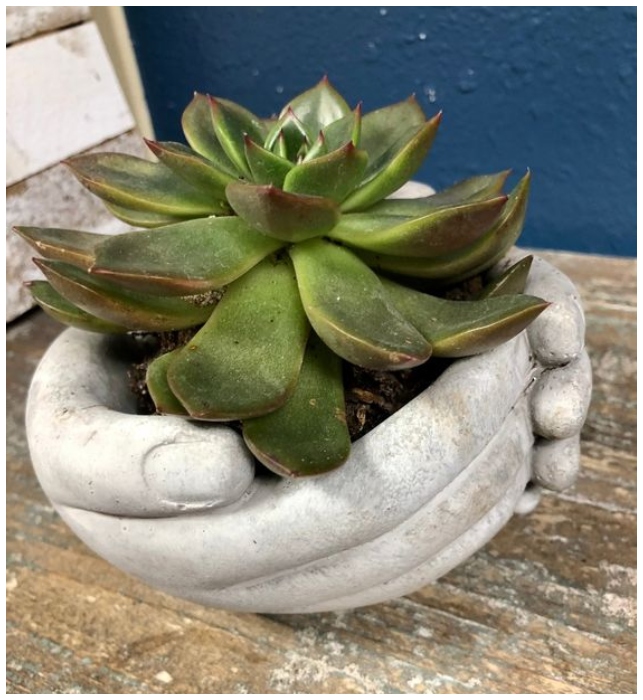
Now, let’s wait! Finally: after your material has dried for a few days, you can take your hands’ mold out of the tub and place plants or paint them to make them look more realistic or funky. This can be done in many different ways!
Wool Woven Basket
This idea might appeal to you if your aesthetic is soft and light in terms of color and concept. Are you a fan of pastel colors and a lot of light entering your space? Yup.

Here’s what you need: Use a piece of jute, a woven basket, or a straw to insert some wool into the gaps. It creates a beautiful decorative addition that looks just like it came from a catalog.
Airy Plywood Planters
It’s time to get your hot glue gun and some plywood scraps out of the bag. Make a sketch of your design and start to build. Take measurements to determine the parts you will need for the abstract design of your choice. We hope that you are handy!
To avoid injuries: trim and sand plywood carefully. Then glue the pieces together. Wait for the plywood to dry before you place the potted plant. You can also use a popsicle stick; we’ll admit it.
Reuse Wood Cabinet Door
You might want to save old wood and cabinet doors for later when you renovate, redecorate, or make changes in construction. Why? We bet that you haven’t heard of this idea.
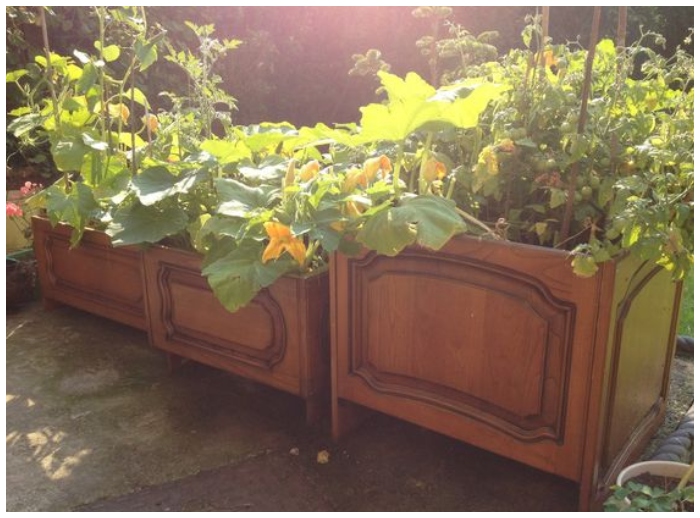
To create a shape: place four sides of a door or cabinet against each other in an open area such as your garden or backyard. Place them in the ground and add soil. Then, plant a seed.
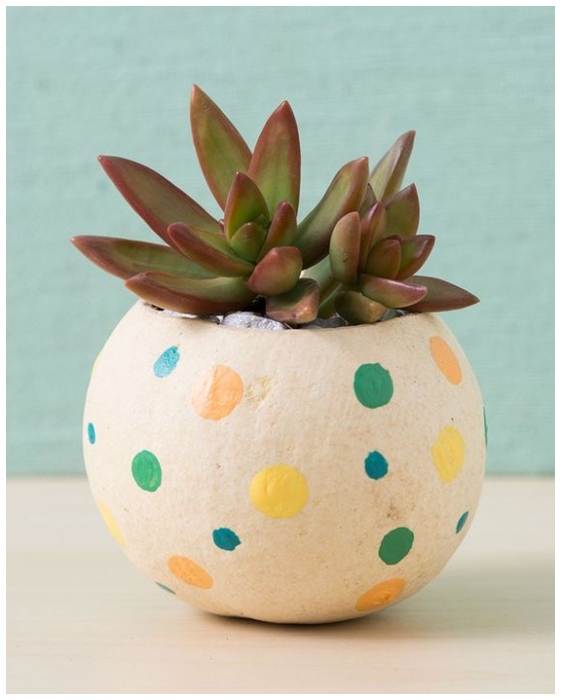
Ombre Pattern Planter
An ombre painting design looks amazing when paired with the right colors and set against the perfect contrast. Although it may sound complicated to create the pattern, there is an easy way to accomplish this. Step 1, get a bucket.
Step 2: find a dry-up brush and a barely usable ink pad. Step 3: add some paint or ink of your choice. Use one stroke to cover the entire bottom of the brush. As the brush dries out, move it upwards.
DIY Succulent Book Planter
Do you have books that have been collecting dust on your shelves, waiting to be opened again? Why not give them a new life by turning them into chic succulent planters? All you need is a sharp knife, some soil, and your favorite succulent.
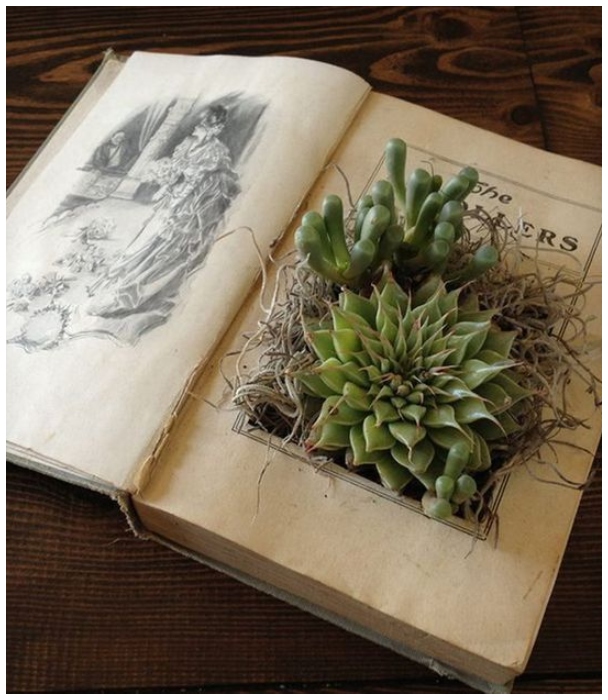
Key information: Don’t worry about ruining your favorite book. Choose one that you won’t mind cutting into, or even an old instruction manual or phone book. With a little bit of creativity, you can transform your old books into a beautiful centerpiece that will add a touch of greenery to any room in your house.
Hanging Planters on a Budget: Upcycling Belts for a Stylish Twist
Many people don’t have excess hangers lying around, so if you have belts you don’t like or use anymore, bring them along! You should make sure that they are strong and wide.
Belts can be used to reduce the surface tension of the pot when it is hanging. This allows the potted plant more freedom to hover over you while you bathe or cook. The best choice: choose some nice belts with neutral colors. However, they can be painted.
The Future of Gardening: 3D Printed Planters You Can Make at Home
Unless you have been living under a rock, such as Patrick from SpongeBob Squarepants, you know that 3D printing technology has become the tool of the future. What does this mean for us?
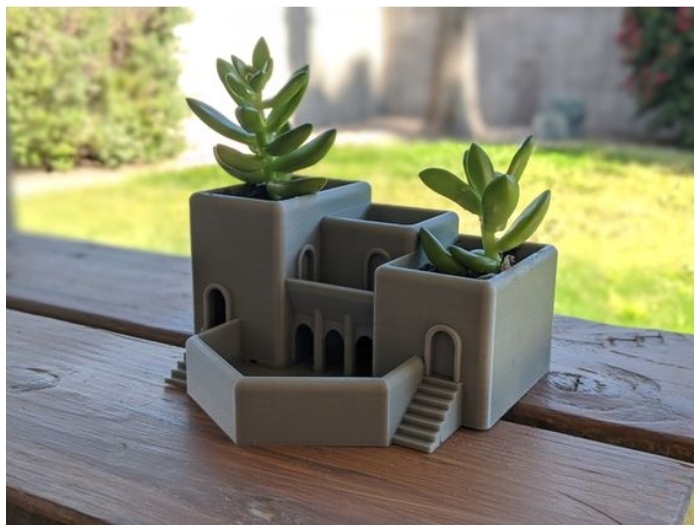
There are many cool ways to make pots and holders for your plants. Surprising information: This pot can be made mechanically in under 30 minutes using the tools of illustration or production.
Pitch Black Design
Hey there, fellow modern and sophisticated friend! Are you a fan of all things black and matte? Everything in your life has a sleek, monochromatic vibe, from your clothes to your furniture. But what about your plants? Well, we’ve got the perfect solution for you! Say hello to the tall and sophisticated rectangular planter featuring a beautiful black finish that will make your plants stand out in all the right ways. This planter is the perfect addition to any monochromatic aesthetic and adds elegance to any room.
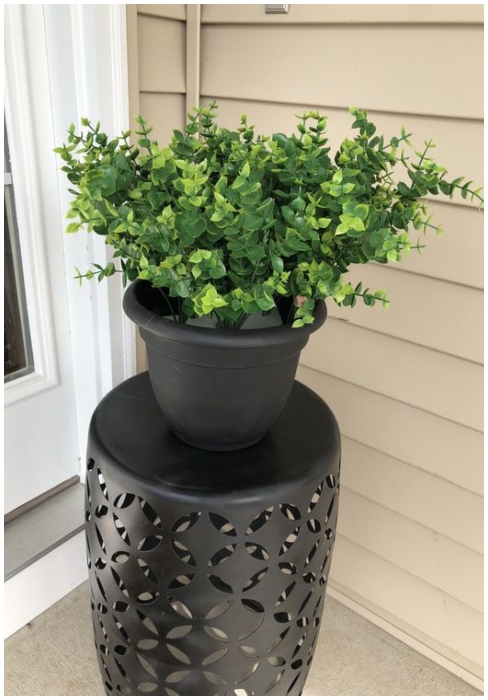
Whether you’re a DIY fan or prefer to buy it pre-made, this planter is an absolute must-have for anyone who loves a sleek and modern look. Imagine your favorite plant nestled inside this gorgeous planter, looking like it was custom-made just for your home. So, if you’re ready to take your love for all things black and matte to the next level, don’t hesitate to get your hands on this beautiful planter. Your plants will thank you for it!